A Fragment represents a behavior of user interface in an Activity. A activity can have more than one fragments and also a fragment can be used in more than one activities.
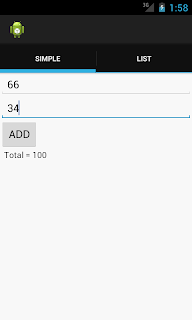
Screen Shots of following tutorial.
Fragment 1
Fragment 2
See, Here I have used the Action Bar to navigate between tabs. Which were added in Android 3.0 (API level 11). So in lower version Action Bar doesn't work. You can take this post as Simple Action Bar tutorial in Android too :)
Following class works as a home for those two Fragments.
FragmentTabs.java
package com.example.fragmentexample;

import android.app.ActionBar;
import android.app.ActionBar.Tab;
import android.app.Activity;
import android.app.Fragment;
import android.app.FragmentTransaction;
import android.os.Bundle;

public class FragmentTabs extends Activity {
 @Override
 protected void onCreate(Bundle savedInstanceState) {
  super.onCreate(savedInstanceState);

  final ActionBar bar = getActionBar();
  bar.setNavigationMode(ActionBar.NAVIGATION_MODE_TABS);
  bar.setDisplayOptions(0, ActionBar.DISPLAY_SHOW_TITLE);

  bar.addTab(bar
    .newTab()
    .setText("Simple")
    .setTabListener(
      new TabListener<FragmentCalculate.SimpleAddition>(this,
        "simple", FragmentCalculate.SimpleAddition.class)));
  bar.addTab(bar
    .newTab()
    .setText("List")
    .setTabListener(
      new TabListener<SampleList.SampleListFragment>(
        this, "list",
        SampleList.SampleListFragment.class)));
  if (savedInstanceState != null) {
   bar.setSelectedNavigationItem(savedInstanceState.getInt("tab", 0));
  }
 }

 @Override
 protected void onSaveInstanceState(Bundle outState) {
  super.onSaveInstanceState(outState);
  outState.putInt("tab", getActionBar().getSelectedNavigationIndex());
 }

 public static class TabListener<T extends Fragment> implements
   ActionBar.TabListener {
  private final Activity mActivity;
  private final String mTag;
  private final Class<T> mClass;
  private final Bundle mArgs;
  private Fragment mFragment;

  public TabListener(Activity activity, String tag, Class<T> clz) {
   this(activity, tag, clz, null);
  }

  public TabListener(Activity activity, String tag, Class<T> clz,
    Bundle args) {
   mActivity = activity;
   mTag = tag;
   mClass = clz;
   mArgs = args;

   mFragment = mActivity.getFragmentManager().findFragmentByTag(mTag);
   if (mFragment != null && !mFragment.isDetached()) {
    FragmentTransaction ft = mActivity.getFragmentManager()
      .beginTransaction();
    ft.detach(mFragment);
    ft.commit();
   }
  }

  public void onTabSelected(Tab tab, FragmentTransaction ft) {
   if (mFragment == null) {
    mFragment = Fragment.instantiate(mActivity, mClass.getName(),
      mArgs);
    ft.add(android.R.id.content, mFragment, mTag);
   } else {
    ft.attach(mFragment);
   }
  }

  public void onTabUnselected(Tab tab, FragmentTransaction ft) {
   if (mFragment != null) {
    ft.detach(mFragment);
   }
  }

  public void onTabReselected(Tab tab, FragmentTransaction ft) {
   new CustomToast(mActivity, "Reselected!");
  }
 }
}
Following program creates the first Fragment.
FragmentCalculate.java
package com.example.fragmentexample;

import android.app.Activity;
import android.app.Fragment;
import android.app.FragmentTransaction;
import android.os.Bundle;
import android.view.LayoutInflater;
import android.view.View;
import android.view.ViewGroup;
import android.view.View.OnClickListener;
import android.widget.Button;
import android.widget.EditText;
import android.widget.TextView;

public class FragmentCalculate extends Activity {
 int i = 1;

 @Override
 protected void onCreate(Bundle savedInstanceState) {
  super.onCreate(savedInstanceState);

  if (savedInstanceState == null) {
   Fragment newFragment = SimpleAddition.newInstance(i);
   FragmentTransaction ft = getFragmentManager().beginTransaction();
   ft.add(R.id.FrameLayout1, newFragment).commit();
  } else {
   i = savedInstanceState.getInt("level");
  }
 }

 @Override
 public void onSaveInstanceState(Bundle outState) {
  super.onSaveInstanceState(outState);
  outState.putInt("level", i);
 }

 public static class SimpleAddition extends Fragment {
  int mNum;

  static SimpleAddition newInstance(int num) {
   SimpleAddition f = new SimpleAddition();

   Bundle args = new Bundle();
   args.putInt("num", num);
   f.setArguments(args);

   return f;
  }

  @Override
  public void onCreate(Bundle savedInstanceState) {
   super.onCreate(savedInstanceState);
   mNum = getArguments() != null ? getArguments().getInt("num") : 1;
  }

  @Override
  public View onCreateView(LayoutInflater inflater, ViewGroup container,
    Bundle savedInstanceState) {
   View v = inflater.inflate(R.layout.addition, container, false);

   Button b = (Button) v.findViewById(R.id.button1);
   final EditText et1 = (EditText) v.findViewById(R.id.editText1);
   final EditText et2 = (EditText) v.findViewById(R.id.editText2);
   final TextView tv = (TextView) v.findViewById(R.id.textView1);

   b.setOnClickListener(new OnClickListener() {

    @Override
    public void onClick(View v) {
     int a = Integer.parseInt(et1.getText().toString());
     int b = Integer.parseInt(et2.getText().toString());
     tv.setText("  Total = "+String.valueOf(a+b));
    }
   });

   return v;
  }
 }

}
Following program creates the second Fragment.
FragmentCalculate.java
package com.example.fragmentexample;

import android.app.Activity;
import android.app.FragmentManager;
import android.app.ListFragment;
import android.os.Bundle;
import android.view.LayoutInflater;
import android.view.View;
import android.view.ViewGroup;
import android.widget.ArrayAdapter;
import android.widget.ListView;

public class SampleList extends Activity {

 @Override
 protected void onCreate(Bundle savedInstanceState) {
  super.onCreate(savedInstanceState);

  FragmentManager fm = getFragmentManager();

  if (fm.findFragmentById(android.R.id.content) == null) {
   SampleListFragment list = new SampleListFragment();
   fm.beginTransaction().add(android.R.id.content, list).commit();
  }
 }

 public static class SampleListFragment extends ListFragment
 {

  String[] numbers_text = new String[] { "one", "two", "three", "four",
    "five", "six", "seven", "eight", "nine", "ten", "eleven",
    "twelve", "thirteen", "fourteen", "fifteen" };
  String[] numbers_digits = new String[] { "1", "2", "3", "4", "5", "6", "7",
    "8", "9", "10", "11", "12", "13", "14", "15" };

  @Override
  public void onListItemClick(ListView l, View v, int position, long id) {
   new CustomToast(getActivity(), numbers_digits[(int) id]);
  }

  @Override
  public View onCreateView(LayoutInflater inflater, ViewGroup container,
    Bundle savedInstanceState) {
   ArrayAdapter<String> adapter = new ArrayAdapter<String>(
     inflater.getContext(), android.R.layout.simple_list_item_1,
     numbers_text);
   setListAdapter(adapter);
   return super.onCreateView(inflater, container, savedInstanceState);
  }
 }
}
Layout design for first child.
addition.xml
<?xml version="1.0" encoding="utf-8"?>
<LinearLayout xmlns:android="http://schemas.android.com/apk/res/android"
    android:layout_width="match_parent"
    android:layout_height="match_parent"
    android:orientation="vertical" >

    <EditText
        android:id="@+id/editText1"
        android:layout_width="match_parent"
        android:layout_height="wrap_content"
        android:ems="10"
        android:inputType="number" >

        <requestFocus />
    </EditText>

    <EditText
        android:id="@+id/editText2"
        android:layout_width="match_parent"
        android:layout_height="wrap_content"
        android:ems="10"
        android:inputType="number" />

    <Button
        android:id="@+id/button1"
        android:layout_width="wrap_content"
        android:layout_height="wrap_content"
        android:text="ADD" />

    <TextView
        android:id="@+id/textView1"
        android:layout_width="wrap_content"
        android:layout_height="wrap_content"
        android:text="TextView" />

</LinearLayout>
Layout which contains FrameLayout1
addition.xml
<?xml version="1.0" encoding="utf-8"?>
<LinearLayout xmlns:android="http://schemas.android.com/apk/res/android"
    android:layout_width="match_parent"
    android:layout_height="match_parent"
    android:gravity="center_horizontal"
    android:orientation="vertical"
    android:padding="4dip" >

    <FrameLayout
        android:id="@+id/FrameLayout1"
        android:layout_width="match_parent"
        android:layout_height="0px"
        android:layout_weight="1" >
    </FrameLayout>

</LinearLayout>
Source code on GITHUB
1.ListFragments in Android with simple example
2.Simple Fragment Example in Android
3. Simple ListFragment Example in Android
Just have a look on here to CustomToast. This CustomToast is created by using Dialog class in android.
I hope this post is useful to you. kindly share your feedback as comment here.


riaclarprob-bi Carlos Boylan https://wakelet.com/wake/N2n1PK9i8LQ3BcXIJUcWv
ReplyDeleteriwhigile
idcaedempni Darrell Orlando FixMeStick
ReplyDeleteYousician
Microsoft Office
chihojehot